Regardless of whether you have an electric or gas heating system, it’s essential to keep an eye on your energy bills. Unexpected spikes could be a sign that your system is struggling.
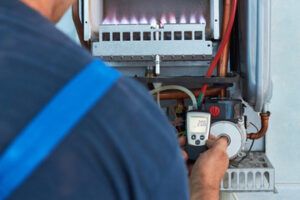
Observing other warning signs could save you from calling for heater repair later on. If your pilot light is yellow, it indicates a gas imbalance and should be looked at immediately. Visit Website to learn more.
A thermostat that isn’t working properly can make you think there is a serious problem with your heater. However, learning how to troubleshoot your thermostat can help you determine if there is a simple solution. Fortunately, most thermostat issues are easy to solve.
Thermostats often stop working due to dead batteries or a simple adjustment. To check for these, simply replace the batteries and make sure your thermostat is turned on. For electronic thermostats, it is best to use AA or AAA lithium batteries. If the new batteries don’t work, it is likely a problem with the unit itself. In this case, it is best to contact a professional.
Another common problem with thermostats is that they don’t read the room temperature correctly. This can be caused by a number of things, including dust accumulation and something accidentally bumping into the thermostat. To test this, simply place a household thermometer in the same room as your thermostat and see if there is a difference between the two readings.
A malfunctioning thermostat can also be caused by loose or broken wires. If you notice any of these problems, it is recommended that you call a professional, as messing with electrical wiring can be dangerous. Alternatively, you can try to fix the problem by removing the thermostat cover and making sure all the wires are firmly connected to their respective mounting screws.
A mechanical problem can also cause thermostats to fail, such as a stuck heat anticipator. If this is the case, you will need to remove the thermostat’s cover and look for a small metal arm that sits on a circular dial. If the arm is stuck, gently pushing it in one direction or another will usually free it. Once the problem has been solved, you can replace the thermostat cover and turn the power back on. As always, when working with electrical wiring, it is best to shut off the power source first and use a compressed air sprayer or brush to clear away any dust. This will help prevent the risk of electrocution.
Faulty Heating Element
The heating element is one of the most important parts of a water heater because it is what actually heats the water. If the heating element is faulty, it will not be able to heat water, and you will get only cold water. The good news is that the heating element is relatively inexpensive and easy for a handyman to replace. However, if you do not feel comfortable working on electric or plumbing issues, you should hire a professional to perform the repair.
The symptoms that indicate a faulty heating element include lukewarm or no hot water, the circuit breaker at the electrical panel tripping, or hot water running out faster than usual. In order to test the heating element, turn off the power to the heater and drain the water by opening the drain valve. If the water heater has a screw-in element, a large socket wrench will be needed to remove it. Make sure that the element is rated for your water heater before buying it.
To test the heating element, set your multimeter to the continuity setting. Touch the red and black probes to each screw on the element terminals. If there is continuity, the multimeter will register a reading of ohms. If the reading is infinite, it indicates a broken element.
During the process of replacing the element, be careful not to bend or twist the terminal pin or sheath. Doing so can fracture the epoxy seal and cause water intrusion. When tightening the terminal nut, always use two wrenches to prevent twisting and fracturing the sheath.
After replacing the heating element, be sure to clean the threads and the “O” ring with a non-toxic cleaner. It is also a good idea to wipe down the inside of the tank to remove any dirt or debris that could interfere with the new heating element. Once the tank is completely dry, reattach the wires and reinstall the plastic cover and insulation. Turn the water heater breaker on and open the hot water taps to test for any leaks. If the breaker or high-temperature cutoff switch trip again, it may be time to replace them as well.
Faulty Blower Motor
The blower motor is a vital component of your vehicle’s climate control system. Although not a major safety concern, if it fails, you can be stuck in hot or cold weather without an effective air conditioner or heater. Thankfully, the blower motor is easy to replace and generally not expensive. This means that you can have it fixed before it starts to affect your driving experience.
The first sign of a problem with your blower motor is usually weak airflow from the vents. This could be a simple issue, such as dust or grime getting built up, but it can also indicate that the blower motor is overheating or nearing the end of its life. A professional technician can help you determine if this is the case and provide you with a replacement solution.
Unusual sounds are another sign that your blower motor is having problems. If you hear squealing, screeching, or rattling noises coming from your vents, turn off the system and call a professional as soon as possible. These sounds may indicate that there is a loose or broken part that needs to be replaced, so the sooner you get it fixed, the better.
If you think that your blower motor is having issues, the first step is to disconnect the negative battery cable. This will ensure that you don’t accidentally damage any electrical components while working on the blower motor. Next, locate the blower motor and remove any bolts or screws holding it in place. Be sure to disconnect the wires connected to the blower motor as well. After this, you can simply remove the motor and install the new one. Be sure to follow the directions provided by your vehicle’s manufacturer when replacing the motor to ensure that it is installed properly. Once the job is finished, reconnect the positive battery cable and test the blower fan to make sure it’s working correctly. It’s also a good idea to have regular HVAC maintenance services done by a professional to catch problems before they become major issues. A professional will check on all of the important components in your car’s climate control system, including the blower motor, to make sure it’s running properly.
Loud Noises
If you’re hearing banging, booming, or squealing noises coming from your system, it’s time to call in the pros. These sounds indicate that there’s a problem with the heating equipment, and it could be causing damage to your home or posing a health risk.
Another common heater issue is running out of hot water. This can be caused by a variety of factors, including an undersized tank, a broken dip tube, or even the temperature dial on your thermostat being turned too high.
If you have a gas heater, a yellow pilot light is also cause for concern. This means that there’s a carbon monoxide imbalance, which is a serious health hazard. A faulty thermocouple or gas control valve can cause this, too, so be sure to consult the manufacturer’s safety manual before attempting any DIY fixes. Getting the most out of your heater requires routine preventative maintenance, which is why we offer a wide range of protection plans. These plans allow Long Island property owners to nip small problems in the bud before they grow into bigger and more costly repairs.


